Getting Started
Getting an organisation sending takes four things: Outreach access, a configured delivery channel, contacts to send to, and content to send them. This page covers them in the order they are needed, and hands over to the Quickstart for the campaign itself.
Prerequisites
At least one delivery channel must be connected before anything can be sent:
- SMS needs a Twilio account with a Messaging Service. See SMS Configuration.
- Email needs a SendGrid account with an API key, plus at least one verified sending domain or sender address. See Email Configuration and Domains and Senders.
Either or both can be configured. A campaign sends on one channel, and only configured channels are offered when a campaign is created.
Who Does What
Setup crosses three roles, so it helps to know who to ask for each part.
| Role | Part in getting started |
|---|---|
| Org Admin | Requests Outreach access and configures the delivery channels, senders and domains |
| Campaign Manager or Admin | Fills the contact store, adds custom fields, builds segments, and prepares saved templates and brands |
| Campaigner | Creates campaigns from that material and runs them |
Roles and Permissions sets out every permission line by line. A Campaigner who only needs to send can go straight to the Quickstart, as long as someone has covered the steps below.
Architecture
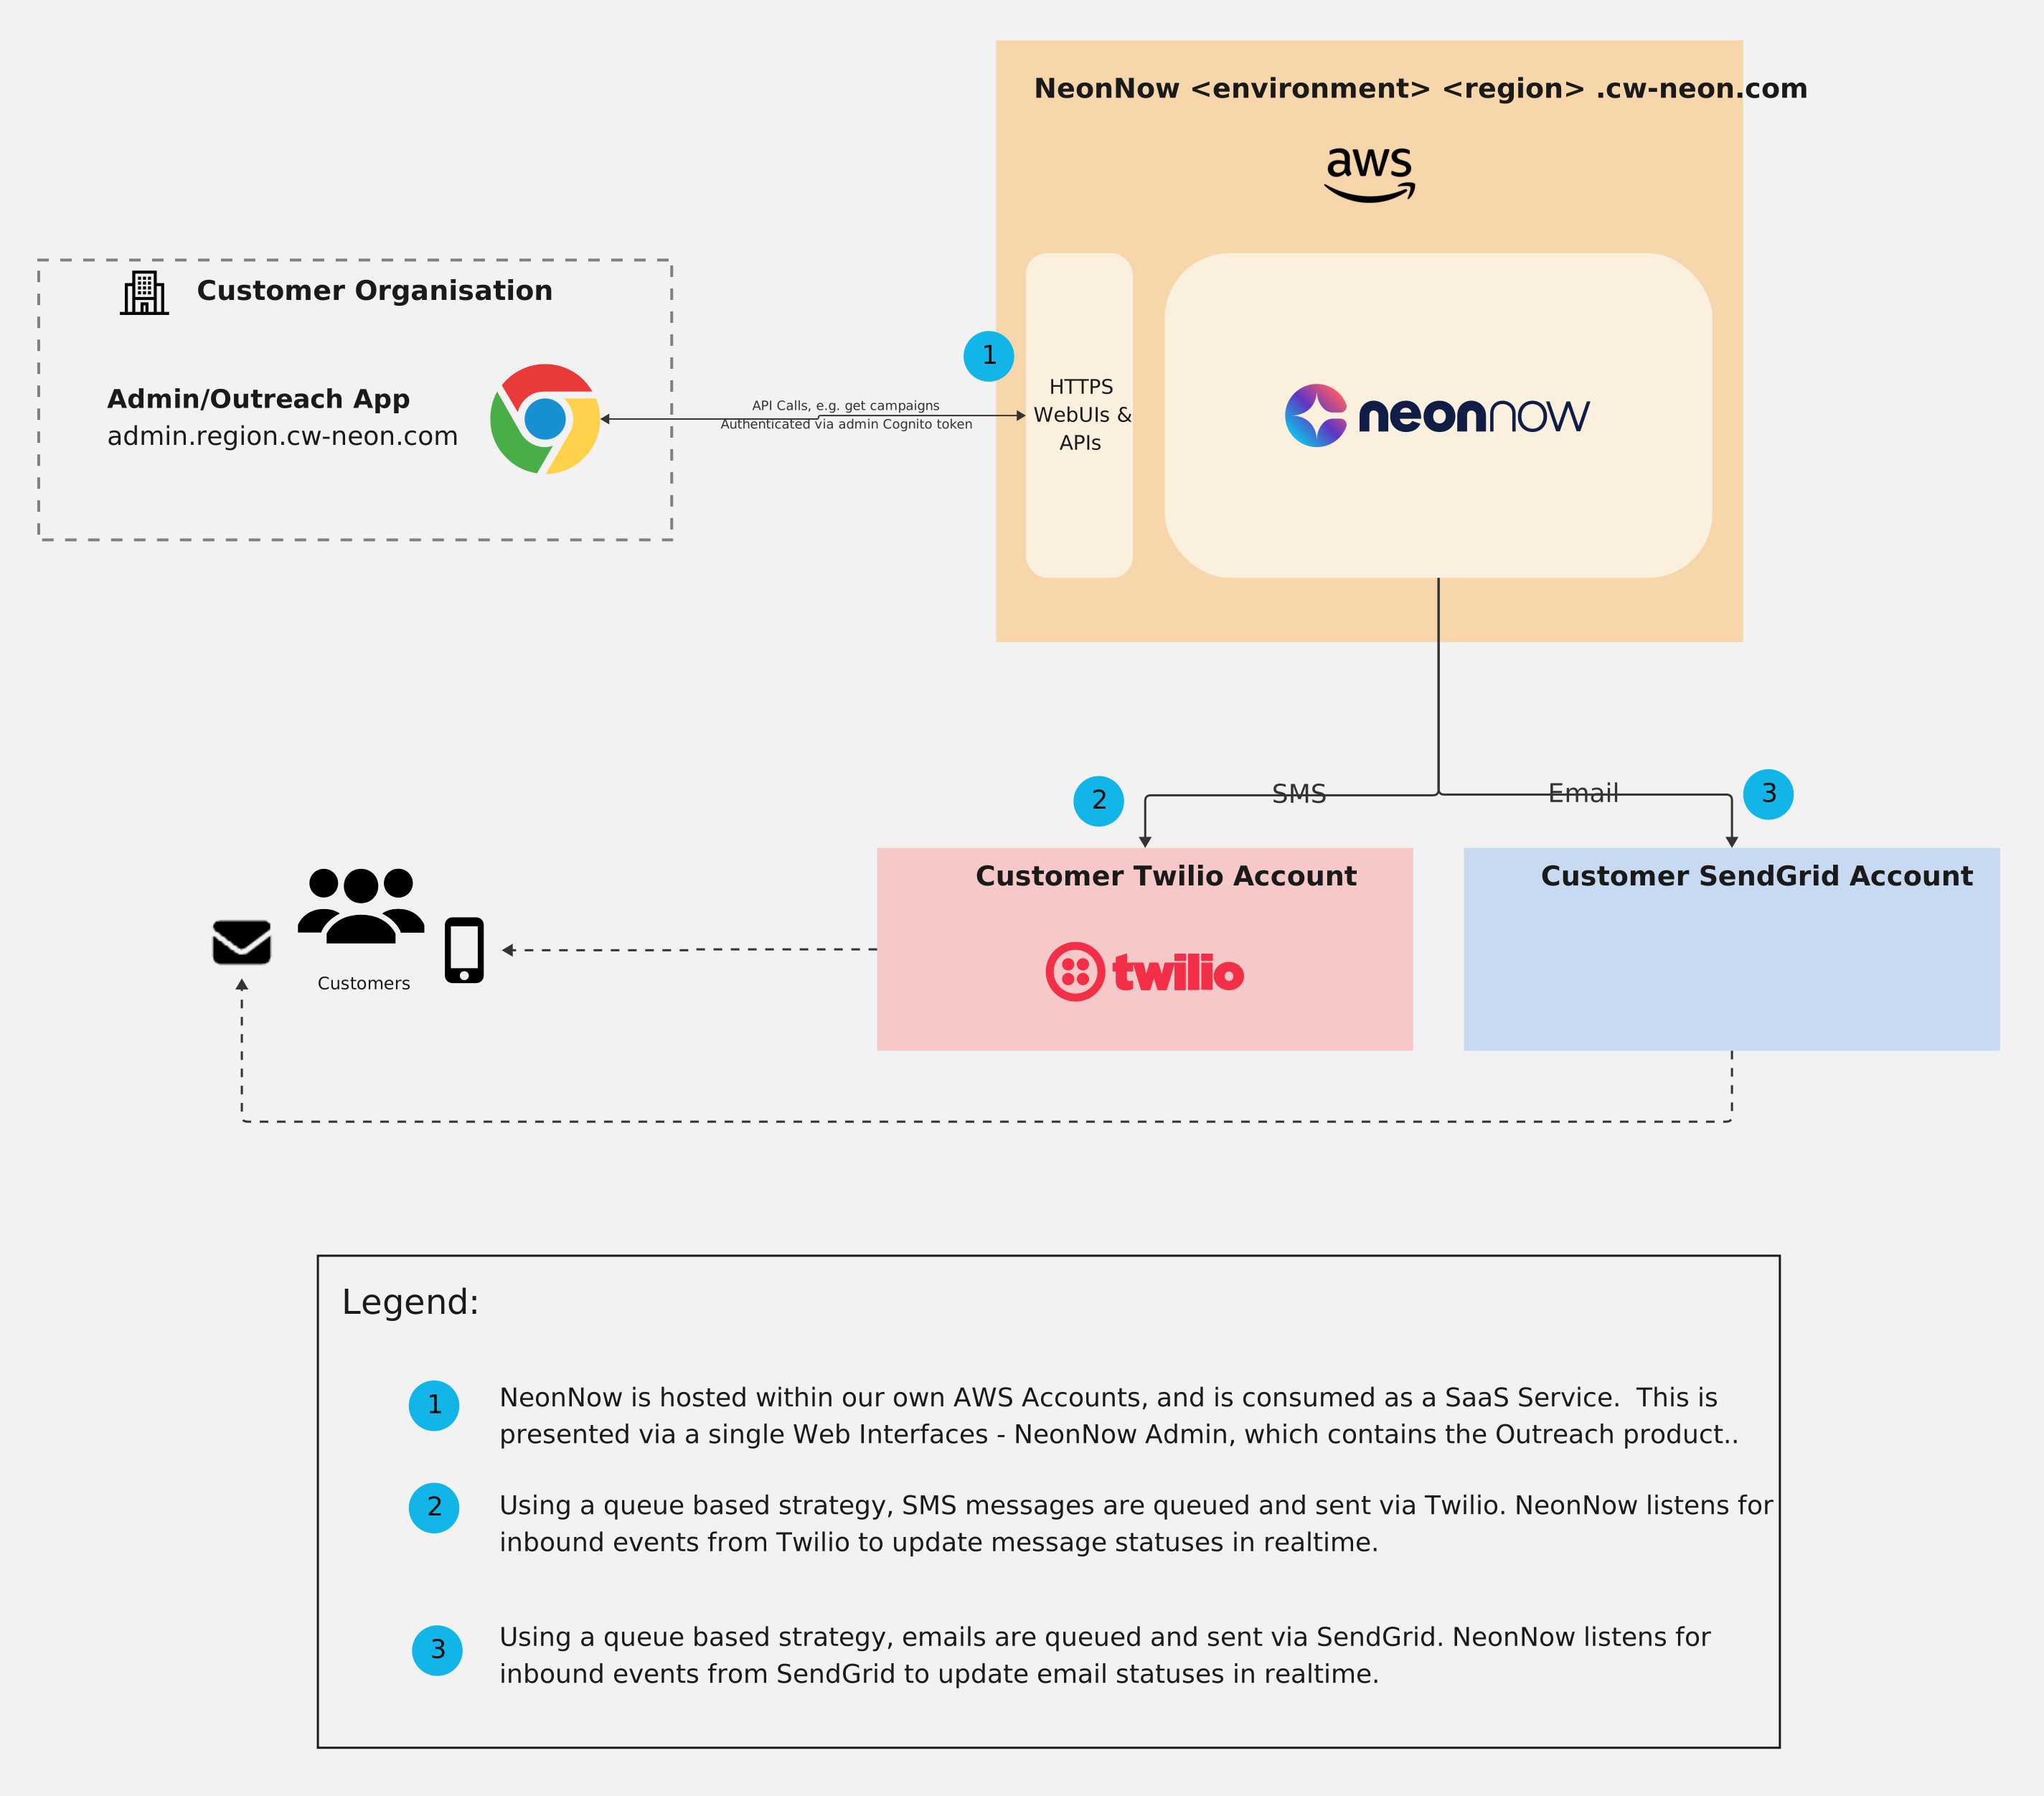
The following diagram shows how Outreach integrates with your organisation, including how campaigns are delivered through Twilio for SMS and SendGrid for email.
Step 1: Request Outreach Access
Outreach is an add-on product that has to be enabled for an organisation before it can be used.
- Log in to the NeonNow Admin app as an Org Admin.
- Select Outreach in the sidebar.
- On the product landing page, select Request Access.
- The request goes to the NeonNow team, who verify eligibility, provision the subscription and confirm when it is active.
The landing page shows a Requested state while the request is being processed, and switches to the full interface once the subscription is active. Nothing else is needed in the meantime. See Requesting Access for the full process, including cancelling a request.
Only an Org Admin can request access. Anyone else reaching Outreach before it is enabled sees a landing page asking them to contact their Org Admin.
Step 2: Configure a Delivery Channel
Channel configuration is Org Admin work, done under Outreach in the sidebar, then Settings.
SMS
- Open Settings, then SMS.
- Enter the Twilio Account SID, Twilio Auth Token and Messaging Service SID.
- The credentials are validated with Twilio before they are saved. If validation fails, nothing is saved and an error explains what to correct.
After Twilio is connected, choose a sender strategy. Sender Pool lets Twilio pick a sender for each message, while Sender Selection gives campaigns a curated list to choose from.
Email
- Open Settings, then Email.
- Enter the SendGrid API Key.
- Add at least one verified domain or sender address. Domain verification is done with DNS records and can take up to 48 hours to propagate.
An email campaign cannot be completed without a verified sender, so start the domain work early. See Domains and Senders.
| Channel | Minimum to create a campaign | Minimum to run one |
|---|---|---|
| SMS | Valid Twilio credentials | Valid Twilio credentials, including a Messaging Service SID |
| Valid SendGrid API key | Valid SendGrid API key and at least one verified sender |
Step 3: Prepare What Campaigns Draw On
Campaigns are assembled from material held at organisation level. A Campaign Manager, Admin or Org Admin sets this up once, and campaigners reuse it.
Contacts
Populate the contact store before the first campaign. Contacts can be added one at a time or uploaded in bulk from a CSV, JSON or XML file. A contact is matched on its identifiers, so uploading a corrected file updates existing contacts rather than duplicating them.
Phone numbers used for SMS must be in E.164 format. Example Files has a working sample in each format.
Fields
Decide what needs storing beyond the reserved fields and add custom fields for the rest. Custom fields are Text, Number or Date, and a field cannot be renamed or retyped once it exists, so agree the naming before creating them. Fields are what segment conditions test and what message variables read.
Segments
Where campaigns target part of the store rather than all of it, build a segment for each group. A campaigner can select an existing segment but cannot create one, so the segments a team needs should exist before they start.
Templates and Brands
Content that will be reused belongs in the template library, and the sending identity that wraps it belongs in a brand. A campaign can still build its own template for a one-off send.
Include the required compliance content while the template is being written: opt out wording for SMS, and an unsubscribe link for email, which is required before an email campaign can be finished.
Step 4: Create the First Campaign
Once a channel is configured, anyone with the Campaigner role or above can create and run campaigns. The Quickstart walks through one end to end.
Core Rules and Limits
| Rule | Detail |
|---|---|
| Contact file | Up to 300,000 rows and 50 MB per file, in CSV, JSON or XML. This applies to the file, not to the contact store or to segment membership |
| Custom field types | Text, Number or Date. A field cannot be renamed or retyped after it is created |
| Campaign channel | One channel per campaign, SMS or email, fixed at creation |
| Message priority | Set per row in a contact file only. There is no campaign-wide or run-wide priority |
| Concurrent runs | Any number of runs send in parallel, including several runs of the same campaign |
| Scheduling | Manual or Repeat. A run started later is scheduled in 15-minute intervals, at least 15 minutes ahead |
| Email attachments | 20 MB in total per template |
| Test messages | Up to 10 recipients per test send, on either channel |
The 10-recipient limit belongs to the Send Test action in the template editor. There is no separate test campaign: a campaign run always sends to its full audience, so verify content with a test send first.
Next Steps
- Quickstart. Build and send a first campaign
- Contacts. Fill and maintain the contact store
- Templates. Write content once and reuse it
- Roles and Permissions. What each role can do